Downtime. When the operation of your electrical system hits the ultimate breaking point.
Motor downtime refers to any period of time when your electric motor is unable to operate due to unexpected factors. Motor downtime most often stems from mechanical or electrical failure of critical components in your system, which can be exacerbated by a lack of preparedness for part failures or a lack of attention to proper maintenance of the system.
Think about when the dreaded “check engine” light comes on in your car. Just because the light is on, it doesn’t mean the car is inoperable straightaway. If you don’t give the problem your attention, however, you’re bound to get there, and it’s bound to be soon.
When an electric motor or any critical component of a motor operation goes down, the costs quickly go up. Engineers and operators equally recognize sustained motor downtime as a failure of operations and management, one that will become expensive over time.
In this article, we’ll get into what kinds of issues can lead to critical motor failures and best practices for keeping the motor in proper working order. We’ll also discuss motor bearings at greater length due to their frequent culpability for motor downtime, and we’ll let you know how Energy Management Corporation makes a difference in motor maintenance and monitoring.
What Causes Motor Downtime?
Electric motors by themselves are relatively simple machines, but because there are many different parts to them, they can get complex in terms of their upkeep and maintenance.
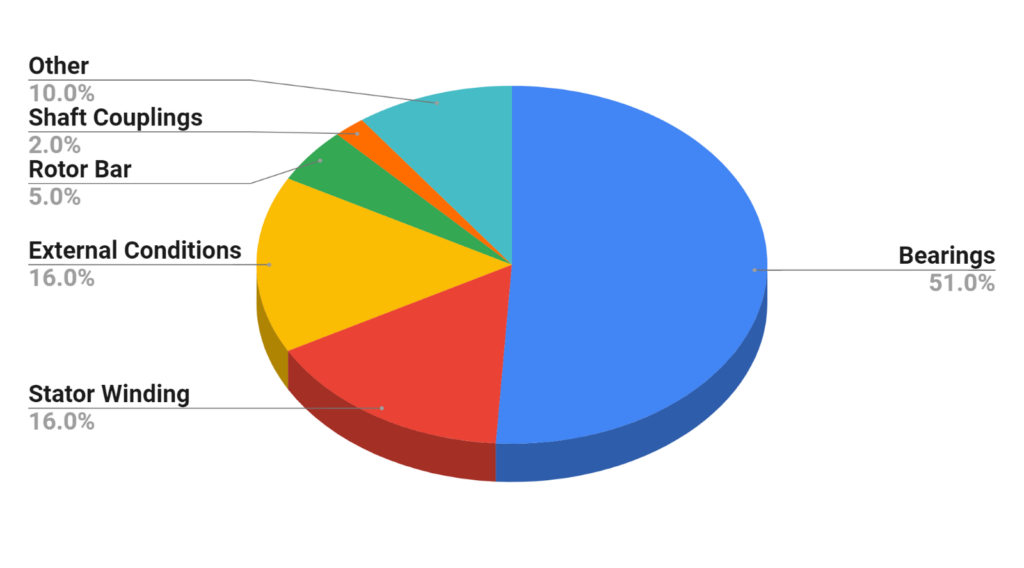
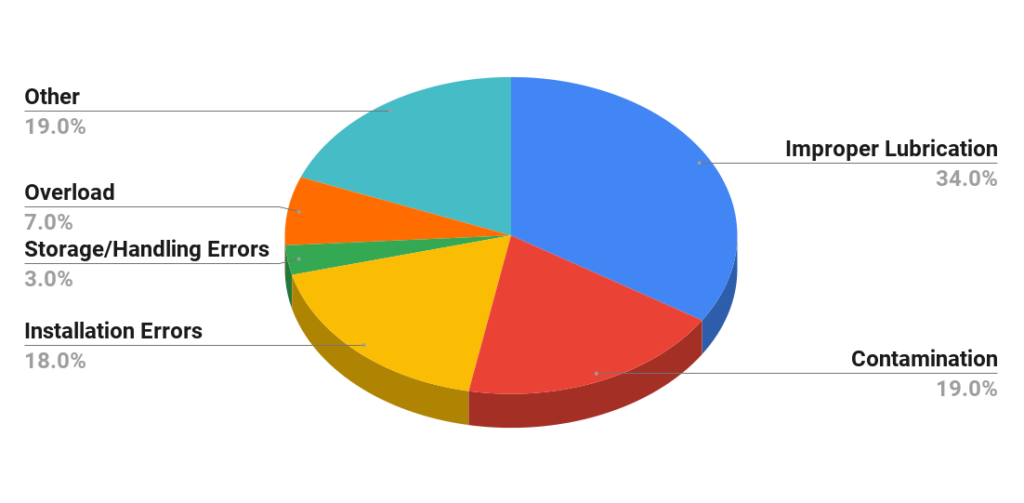
Based on our internal data, the graph above shows the most common causes of motor downtime. There are a number of things that can go wrong with improper maintenance, but as is indicated, most problems and failures boil down to issues with the bearings.
Most of the issues presented in these statistics are initially combatted by practicing proper maintenance and installation methods.
Bearing Failures
Electric motors require the use of bearings to facilitate the rotation of their shafts and rotors, or simply, all their moving parts. Because of their role, and the commonality of poor maintenance on them with many systems, bearings can wear down and fail at a much higher rate than other components of the motor.
There are many reasons as to why bearings fail. To get more in depth on bearings, scroll down to “Bearing Failures: The Usual Suspects.”
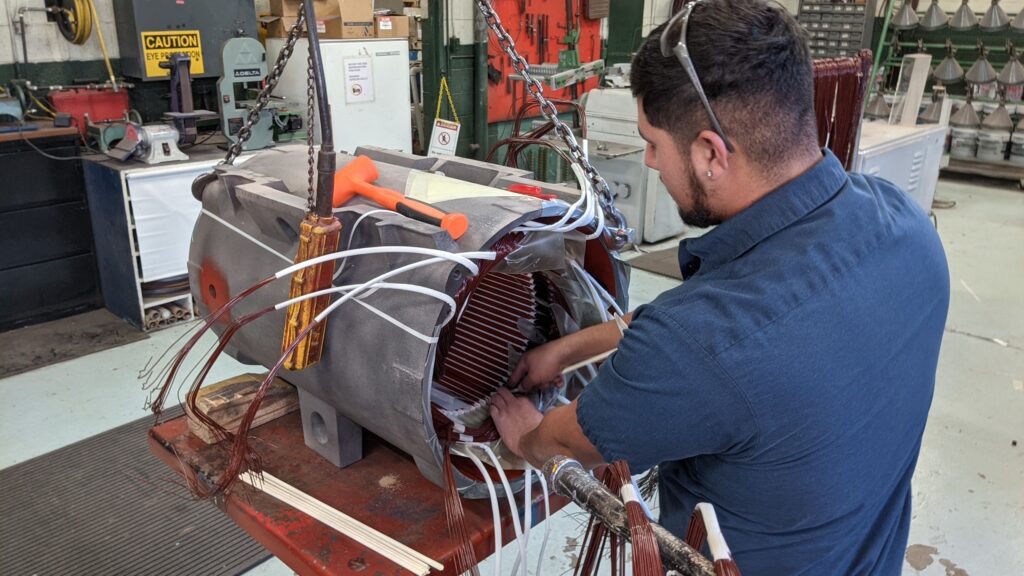
Stator Winding
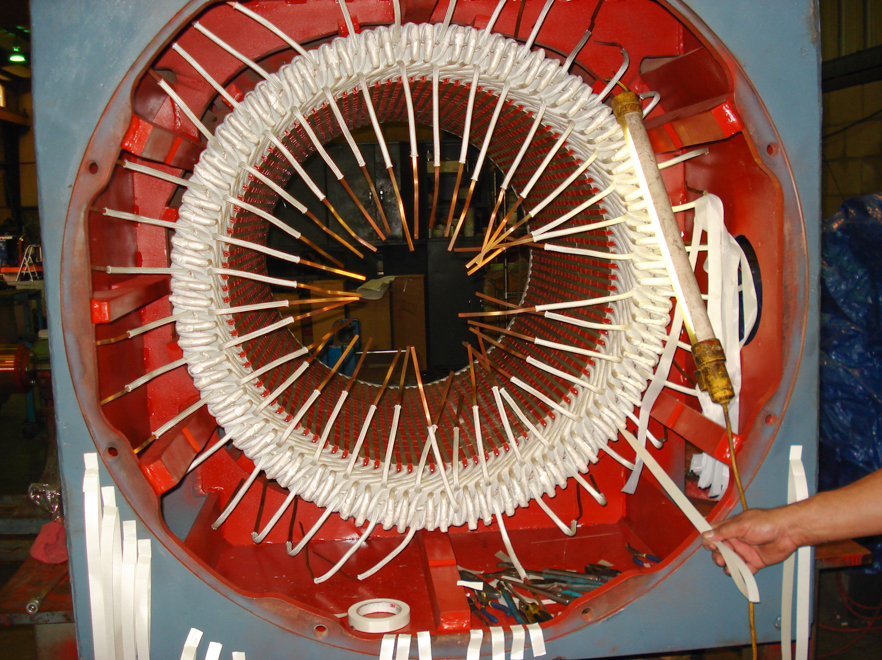
The stator winding is the copper or metallic coils that are wound around the stator in order to create the electromagnetic field that facilitates the spinning of the rotor shaft.
This winding is intricate in nature, and wrapping the wiring around the stator is a meticulous process. Because of this, the wiring either might not be installed as well as it should be, or there could be defects in the insulation causing overheating. Other reasons for winding failures include contamination, vibration, abrasions, or surges in voltage.
When windings go bad, the motor usually requires a rewind, which is when the wiring is completely redone around the stator. There are cases when it may be the better financial option to just replace the motor entirely. The motor may be considered beyond economic repair (BER) if it’s a smaller motor typically running under 75 horsepower, or if the motor experienced a catastrophic failure causing widespread damage. If the windings aren’t in need of critical repair, a recondition of the motor would suffice, as the stator gets a new coat of baked resin among other work to restore the motor to top condition.
Rotor Bar and Shaft Couplings
The rotor bar is the bar which runs through the motor and causes it to rotate, spurred on by the rotating magnetic field generated by the stator.
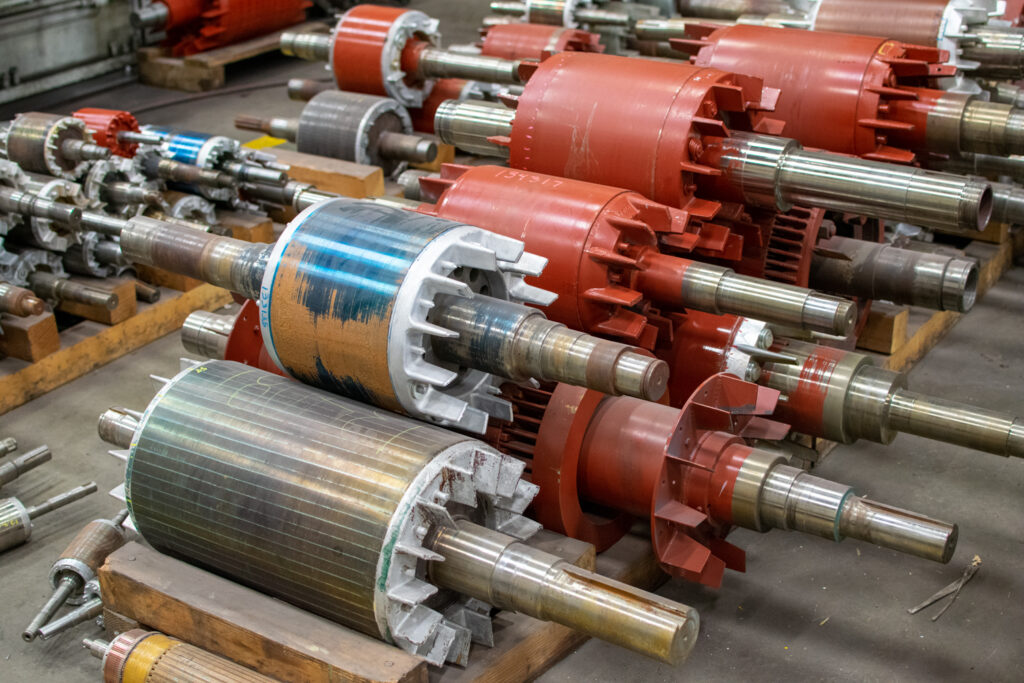
Because of its active role in the motor’s movement, rotor bars naturally degrade over time from the friction of moving parts in the system. This can eventually lead to a cracked bar or overheating of the bearings and shaft couplings, which are the mechanical connections between rotor shafts.
Thermal stresses are ultimately the No. 1 offender when it comes to rotor bar breakdowns. Plenty of heat runs through the windings of the stator, and with the expansion of those metal components, other parts that experience friction or stress, like the rotor, will move around enough to eventually break.
You might also see other common detrimental factors take a toll on your rotor bars. Vibration, for example, can cause the rapidly spinning bars to experience overwhelming torsion that will eventually break or warp the bar.

External Conditions
When installing a motor into a power system, operators have a plethora of factors to consider, and the environment is a significant one of those. The protections on motors can range from being Open Drip-Proof (ODP), where the motor has overhead protection against falling water or rain but is otherwise uncovered, to Totally Enclosed Fan-Cooled (TEFC), where an internal fan keeps the motor’s heat level down inside a protective enclosure.
External conditions are the things happening outside of the motor that can have an effect on the life, performance, and safety of the motor’s operation. This could include excessive heat, water or moisture in the area (up to and including flooding), ventilation, structural integrity, and contamination in the system such as dirt, dust, or metallic flecks.
Bearing Failures: The Usual Suspects
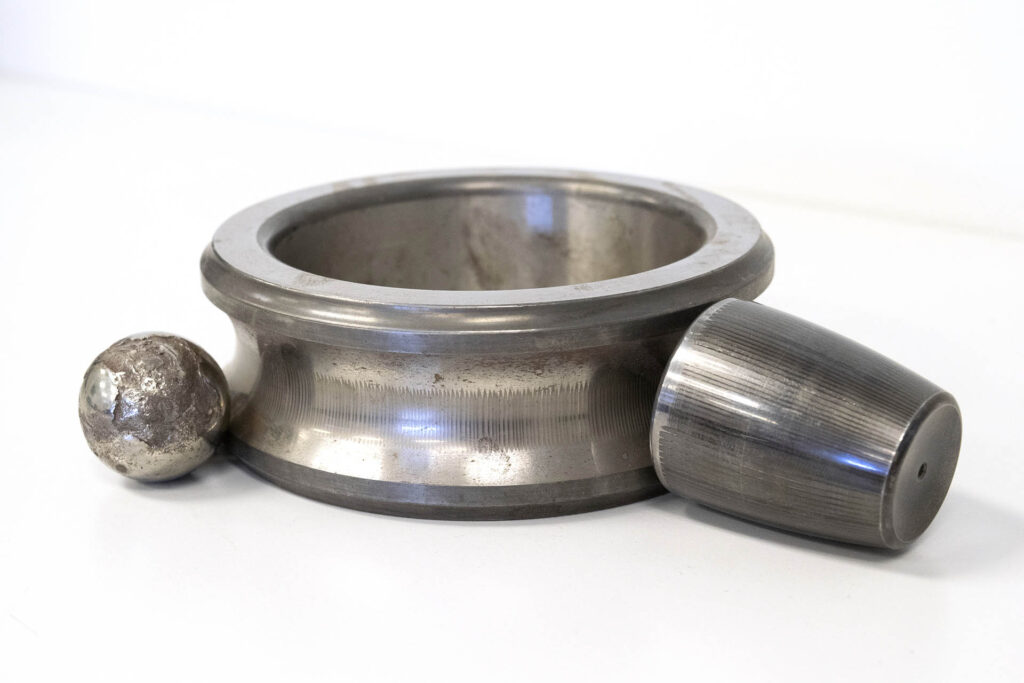
Motor bearings comprise the mechanical device that facilitates the rotation of the motor shafts. The bearings consist of a moving inner ring and a stationary outer ring with a series of balls or rollers in between to allow motion.
As shown previously, bearing failures are the culprit for a little more than half of all the motor failures we evaluate. This happens so often because of the high-stress role that bearings have in a motor system. Because of what bearings do and how critical they are to the motor’s operation, there are several factors that can contribute to their breaking down.
What’s also notable about bearing failures is that most factors that cause it are preventable, or at least can be highly mitigated, by following correct procedures. In essence, the power to have healthy long-lasting motor bearings is largely in your control.
Improper Lubrication
When it comes to the proper function of motor bearings, friction is the enemy. As such, many standard bearings need to be lubricated with grease to allow smooth motion of the inner shaft ring.
Many motor operators underprioritize the need to lubricate their bearings properly. This could include inconsistent time intervals between applications or using incorrect or incompatible grease. You could also be over-greasing your motor casing causing it to spread to other parts or overheat as the bearings churn the grease trying to move through it.
Another major problem is mixing incompatible greases in the same bearing. This can make them degrade or not function correctly. Full replacement of grease lubrication is practically impossible without employing drastic measures, so it’s important to mind that the grease being added isn’t a bad pairing with the grease already in the system. Ultimately, the best course of action is to use the same grease. This article from Machinery Lubrication is also a good resource for determining grease compatibility in your motor bearings.
While our research indicates lubrication issues as the culprit for roughly a third of all bearing failures, some reports have estimated the percentage as high as 80%.
Here’s another article from Machinery Lubrication to learn about how to implement best practices in bearing lubrication for electric motors.
Contamination
Contamination is when debris, dust, or any other foreign particle or substance enters into the inner workings of the motor. With the bearings, the contaminator can infiltrate areas where lubricant is applied and cause undue friction on the system’s motion.
The threat of motor contamination is one of the most prominent reasons why it’s important for your motor to operate in a clean space. The likelihood of contamination increases in work settings with invasive amounts of dust and dirt or if your motor is not properly enclosed. However, there are many applications for motors where a high standard of cleanliness in the area is just not possible, such as mining or waste management. In these environments, facility managers should place a higher standard on the protection of the motor itself, such as sealed bearings, upgrading the enclosure to meet a higher NEMA rating, or scheduling more frequent maintenance.
In the motor as a whole, it’s these external conditions that often lead to contaminants. In the case of bearings, they are uniquely susceptible to failure from contamination since the presence of extra friction or abnormal operative conditions will quickly wear down.
Installation Errors
Many bearing failures originate from errors in how they were installed in the motor. This isn’t to say that motor shops are untrustworthy with bearing installation, particularly if your preferred shop is EASA-accredited, but if bearings are failing more rapidly than normal, installation quality may often be the culprit. The most common installation errors include misalignment, not balancing the motor properly, or mounting incorrectly.
During installation, errors can occur in the process when operators use excessive force to set the bearing. This can cause deformation in the shaft ring which will greatly imbalance the bearing in operation, leading to vibration.
Because of the number of things that can go wrong with installing bearings, we highly recommend either stick hard unfailingly to proper installation procedure or get with an expert to ensure your bearings work optimally after setup. Laser alignment and other practices can help to prolong the life of your bearings.
Overload
While overload isn’t a challenge unique to just bearings as it essentially can affect or damage every part of a motor and other components, the bearings of the motor are especially vulnerable to its effects as far as mechanical failure is concerned.
Overload of the motor creates undue pressure on motor bearings, which can lead to premature failure due to excessive heat, increased pressure, or harmful currents in the bearing system.
When overload occurs, the heat generated throughout the system’s components causes the grease in the bearings to thin out or melt, and the liquefied lubricant can more easily find its way out of the bearing casings. This inevitably leads to poor lubrication of the bearings which causes their rapid deterioration.
Storage & Handling Errors
Bearings are widely considered as a critical spare part in a motor system, and it’s highly recommended to keep reliable quantities on hand while also not letting them sit for too long. Care needs to be taken in the setting and environment that critical spares are stored in. Bearings should not be stored in places with a lot of dust, dirt, mold, or other corrosive elements.
Handling issues include leaving boxes open and opening packaging of bearings prematurely. This leads to these parts being exposed for a longer period of time and likely to have some corrosion before ever being used.
Best Practices for Motor Maintenance
In spite of all practices performed to ensure a long-living motor, motor downtime is inevitably going to happen at certain points in time. This could be for the interchange of critical spare parts, load testing, or other planned occurrences.
For repair of an electric motor, it’s important to be proactive in detecting and assessing needed repairs so that the downtime you’ll inevitably have is both brief and scheduled rather than being unplanned, which will likely be a longer event as your business waits on the arrival of a technician or critical parts.
Motor Repair Process
When a technician conducts repairs on your electric motor, the process should be thorough, addressing any trouble points, improving deteriorative elements, and testing various aspects of the finished product for quality.
A motor rewind, the repair process in which the windings around the stator are redone and tested, is one of the most common repair jobs technicians do on electric motor systems. Conventionally speaking, much of the motor repair process is the same until the technician addresses any specific problems. Here are the six main steps of a motor rewind:
1. Visual Inspection
Prior to this point, the motor parts should be cleaned to prevent contamination during testing and later reassembly. Then, the technician visually inspects the parts for cracks, broken bolts, abrasions, or any other clear and present damages.
2. Mechanical Inspection/Disassembly
Once visual inspection is complete, the technician disassembles the motor, installing the rotor onto parallel rollers and removing the bearing housing. They’ll then take runout measurements on the rotor iron and shaft and perform mechanical inspections of both the shaft and bearing housing.
Our preference is for the mechanical inspection to be a measurement of six points on the critical areas of the shaft. Our standard for this inspection is subject to pass/fail ratings based on EASA AR-100.
A technician will photograph damages, documenting all findings, and may take charge of ordering critical part replacements if necessary.
3. Winding Removal/Core Prep
After taking measurements on the stator core and performing a core test, the technician then prepares the stator for pyrolysis. More commonly called a “burn-off,” pyrolysis is the process of entering the stator into a burn oven to eliminate the old resin on the windings.
This preparation involves inserting a Resistance Temperature Detector (RTD) to monitor the temperature of the stator while burning. An RTD is designed specially to measure the increase in the stator’s electrical resistance as the temperature rises.
Once prepared, the technician then puts the stator into the oven, burning off all the resin to allow for removal of the windings. This usually takes upwards of 14 hours, and the oven cannot reach above 700° F or the iron in the motor may be damaged, reducing reliability and efficiency.
Once the burn cycle is finished, the stator must be normalized to room temperature before removal to prevent it from warping or cracking. Then the technician removes the windings carefully so as not to bend or deform the iron teeth of the stator.
Once the windings are removed, the stator core gets a walnut shell blasting to clean out any excess laminations that may be rolled over or short against each other. Then a post-core test is performed to ensure that core change is less than 20% and watts/lb. is 4 at maximum to achieve the standards set for EASA-accredited workshops.
4. Rewinding
Now that the process of removing windings has been completed and the stator has been tested, the technician can begin to work on rewinding. This starts with calculating the circular mills per amp based on design and slot fill.
The technician then pulls the wire in hand and sets up the automated coil machine for the correct dimensions to make coils. After testing the machine, the technician then makes the coils and installs them along with insulation into the stator core.
Once the tech has installed the coils and checked the layout of the winding connection, they then weld and insulate the leads and connections, then they shape and tie the coil end turns. The housings are then checked for fit.
Finally, the stator is once again heated, this time to 325° F, for moisture and oil removal from the wire and then cooled to 150° F for vacuum pressure impregnation, which seals polyester resin to the winding and closes any air voids. It’s then re-baked at 325° F, cooled, and tested to EASA AR-100 standards.
5. Rotor/Shaft Testing & Repair
While the windings are completed, the technician will address the rotor and shaft to evaluate if they are compliant with EASA AR-100 standards. This starts with testing the shaft dimension for if it’s out of tolerance, which means the dimension is outside the range of allowable minimum to maximum tolerances, also known as the tolerance band.
If found out of tolerance, the technician must weld and machine the shaft back to an allowable tolerance.
A growler test is conducted on the rotor to check for cracks or broken bars. This is done using a testing machine that induces electrical current through the rotor, and a feeler is used to detect any shorts or current discontinuities.
6. Reassembly/Final Testing
The motor is reassembled after all repairs have been completed. All of the final tests are conducted, including electrical testing, vibration monitoring, and run testing. The motor is painted and prepared for pickup or delivery back to site.
The oft-ignored Thermal Switch
A thermal switch is a switching device on an electric motor that detects temperature changes and can activate or deactivate a circuit based on preset thresholds. Most motors will have a basic thermal switch in the modern age, and many will have a more advanced option such as a resistance temperature detector. Despite their prevalence, our experts often find that many facility operators do not connect them to the circuit. This, in turn, leaves your motor vulnerable to damaging temperature changes that could otherwise be avoided using equipment already in possession.
The decision to connect this sensor may rely on several factors, including protecting the warranty of many motors. It is also mandatory in many parts of the world to have a temperature sensor on your motor in some fashion. For motors with variable frequency drives (VFDs), controls to protect the motor are typically built in, but it requires a device like a thermal switch or RTD to let it know when a dangerous temperature has been reached.
Sensors – The “check engine light” of your motor
While the motor repair process, done correctly, is pivotal in extending the life of your motor, reducing downtime, and eliminating deteriorative conditions and factors, it’s highly recommended that you pursue monitoring solutions for your facility that help you get ahead of future threats to your motor’s functionality.
Remember what we said about “check engine” lights? Electric motors don’t have a dashboard with all the warning lights you need, but remote monitors fill this role.
Vibration monitoring sensors and testing equipment are exceptionally helpful in mitigating unplanned downtime by helping you detect problems with the motor early on. Sensors can work wirelessly to detect damage, misalignments, or imbalances well in advance of them becoming a serious issue. Essentially, you have the ability to solve problems before they happen. Not only do these monitors give you more vibration data than a technician with a monitoring route, but they connect into your PLC or SCADA systems and provide warnings as soon as issues are detected.
Many facility operators either don’t consider condition monitoring or only monitor on infrequent occasions. This often boils down to a cost concern. Condition monitoring is not cheap, but it does allow you to project and better plan the cost of repairs and maintenance down the road, which will inevitably be far less expensive than handling repairs only after it’s already an emergency.
Click here to find out more about how Energy Management Corp recently partnered with HECO and Northwest Electric to purchase Relayr’s Skyler Rotate.
Mitigate Motor Downtime with EMC
At Energy Management Corporation, we’ve been in the business of electric motor sales, repair, and maintenance for nearly 50 years. Our expert engineers and technicians have generations of experience and knowledge in how to create and support a reliable and efficient electric power system and eliminate unplanned motor downtime.
Our motor shops are based all across the western United States with repair facilities in Salt Lake City (UT), Boise (ID), Pomona (CA), and Rock Springs (WY) and regional offices in between. Our team can meet with you to educate and consult on all types of issues and needs with your motor to help you reduce motor downtime and get the most out of your motor.

Matthew is a marketing specialist specializing in VFD, motor, and generator applications. He has worked with EMC since February of 2024 and was previously an award-winning journalist covering numerous topics. He enjoys mountain hikes, being a father of girls, and wearing out the office popcorn machine.